eSIM Activation vs Installation: What's the Difference? Installing your eSIM doesn't usually start your plan. Understanding the difference can save you from activating too early.
Written By SuperiorMe
Published Jun 15, 2026
You purchase your eSIM weeks before your trip.
You receive the QR code and installation instructions.
Then a question pops into your head:
"If I install my eSIM now, will it start immediately?"
Fortunately, in most cases the answer is no.
Installing an eSIM and activating an eSIM are usually two completely different steps.
This is one of the most misunderstood parts of travel eSIMs.
Many travellers worry that installing an eSIM before departure will waste valuable travel days. In reality, most eSIMs only activate when they first connect to a supported network at your destination.
Installation vs Activation: Understanding the Difference
The easiest way to think about it is:
- Installation adds the eSIM to your phone.
- Activation starts the plan when the eSIM connects to a supported network.
They sound similar, but they happen at completely different times.
Installation
Installation simply downloads and stores the eSIM profile on your device.
- The eSIM is added to your phone
- No travel data is used
- Your validity period has not started
- You can complete setup before travelling
Think of it like inserting a physical SIM card into your phone.
Activation
Activation occurs when the eSIM first connects to a supported mobile network.
- You arrive at your destination
- The eSIM is enabled
- Data roaming is turned on
- The eSIM connects to a supported network
Only then does your plan validity begin.
Real Example
Suppose you purchase a 15-day Japan eSIM in June for an August holiday.
You can install the eSIM immediately after purchase. Your 15-day validity period won't start until the eSIM first connects to a supported network in Japan.
SuperiorMe's 180-Day Activation Window
One of the biggest advantages of SuperiorMe eSIMs is flexibility.
Every SuperiorMe eSIM includes up to 180 days to activate.
This allows travellers to:
- Purchase during sales and promotions
- Plan trips months in advance
- Install before departure
- Avoid airport Wi-Fi setup
- Travel with confidence
Some providers only allow 60 or 90 days before activation, making timing much more restrictive.
Should You Install Your eSIM Before Travelling?
Absolutely.
In fact, installing before departure is one of the simplest ways to avoid travel headaches.
Installing early helps avoid:
- Airport Wi-Fi issues
- Lost QR codes
- Email access problems overseas
- Last-minute setup stress
- Troubleshooting after a long flight
Simply install while connected to your home network or Wi-Fi and activate once you arrive.
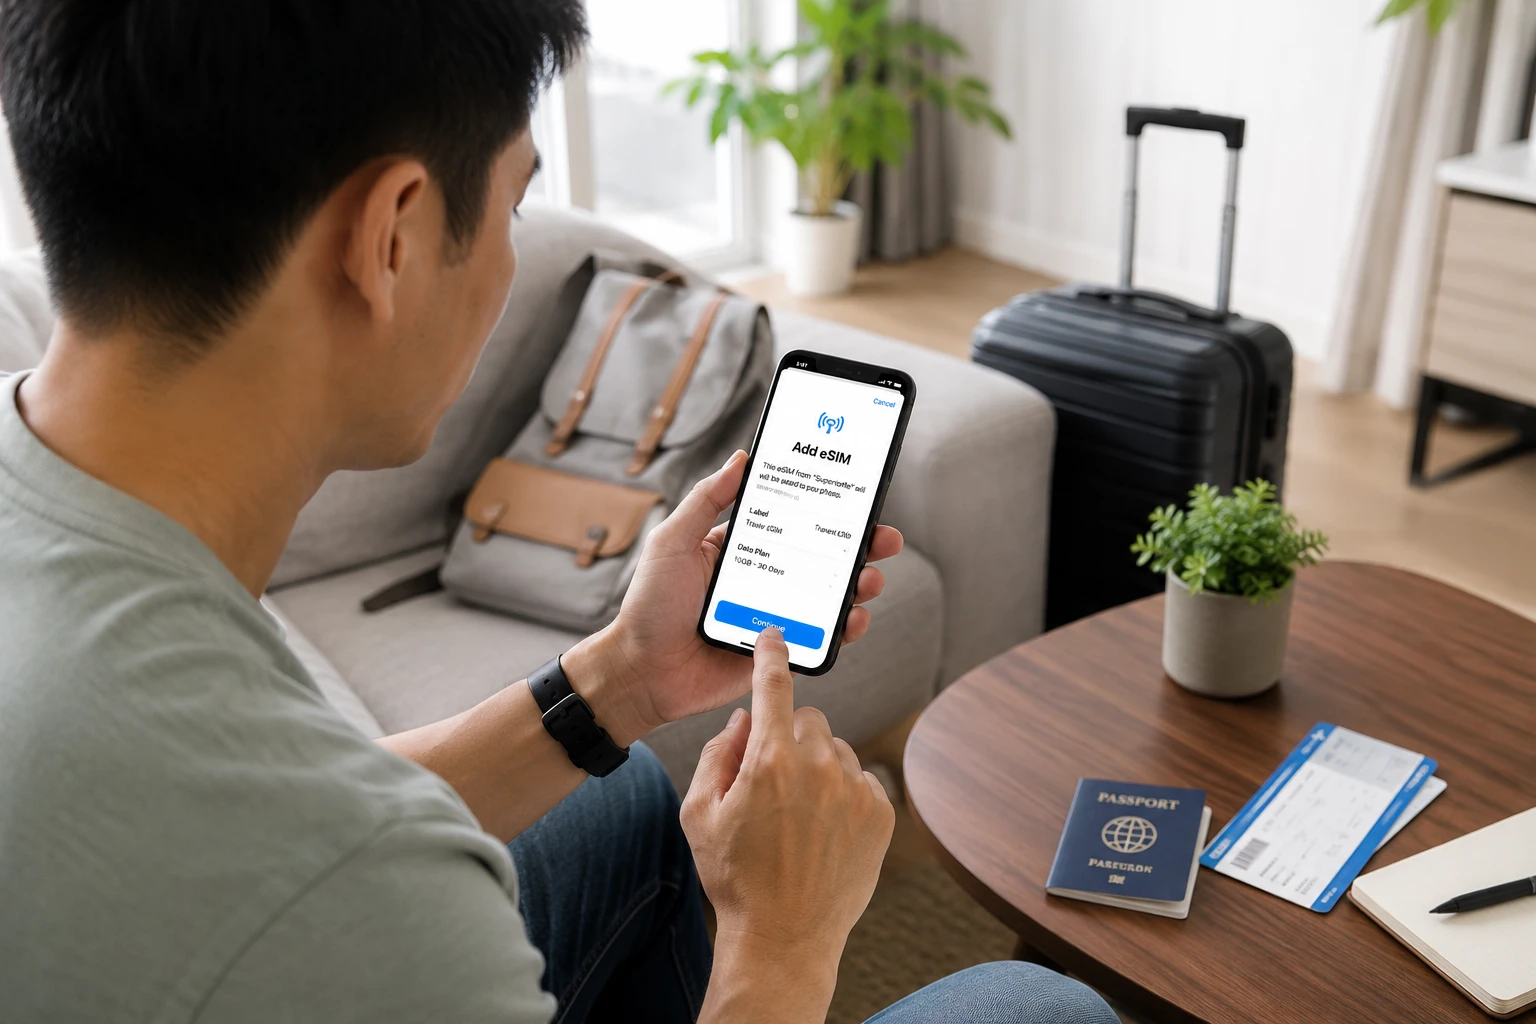
How to Install an eSIM on iPhone
SuperiorMe supports both One-Click Installation and QR Code installation on supported devices.
Option 1: One-Click Installation (Recommended)
- Open the SuperiorMe eSIM email on your iPhone.
- Tap the installation link.
- Follow the prompts.
- Allow iPhone to add the eSIM.
- Label the eSIM if desired.
Option 2: QR Code Installation
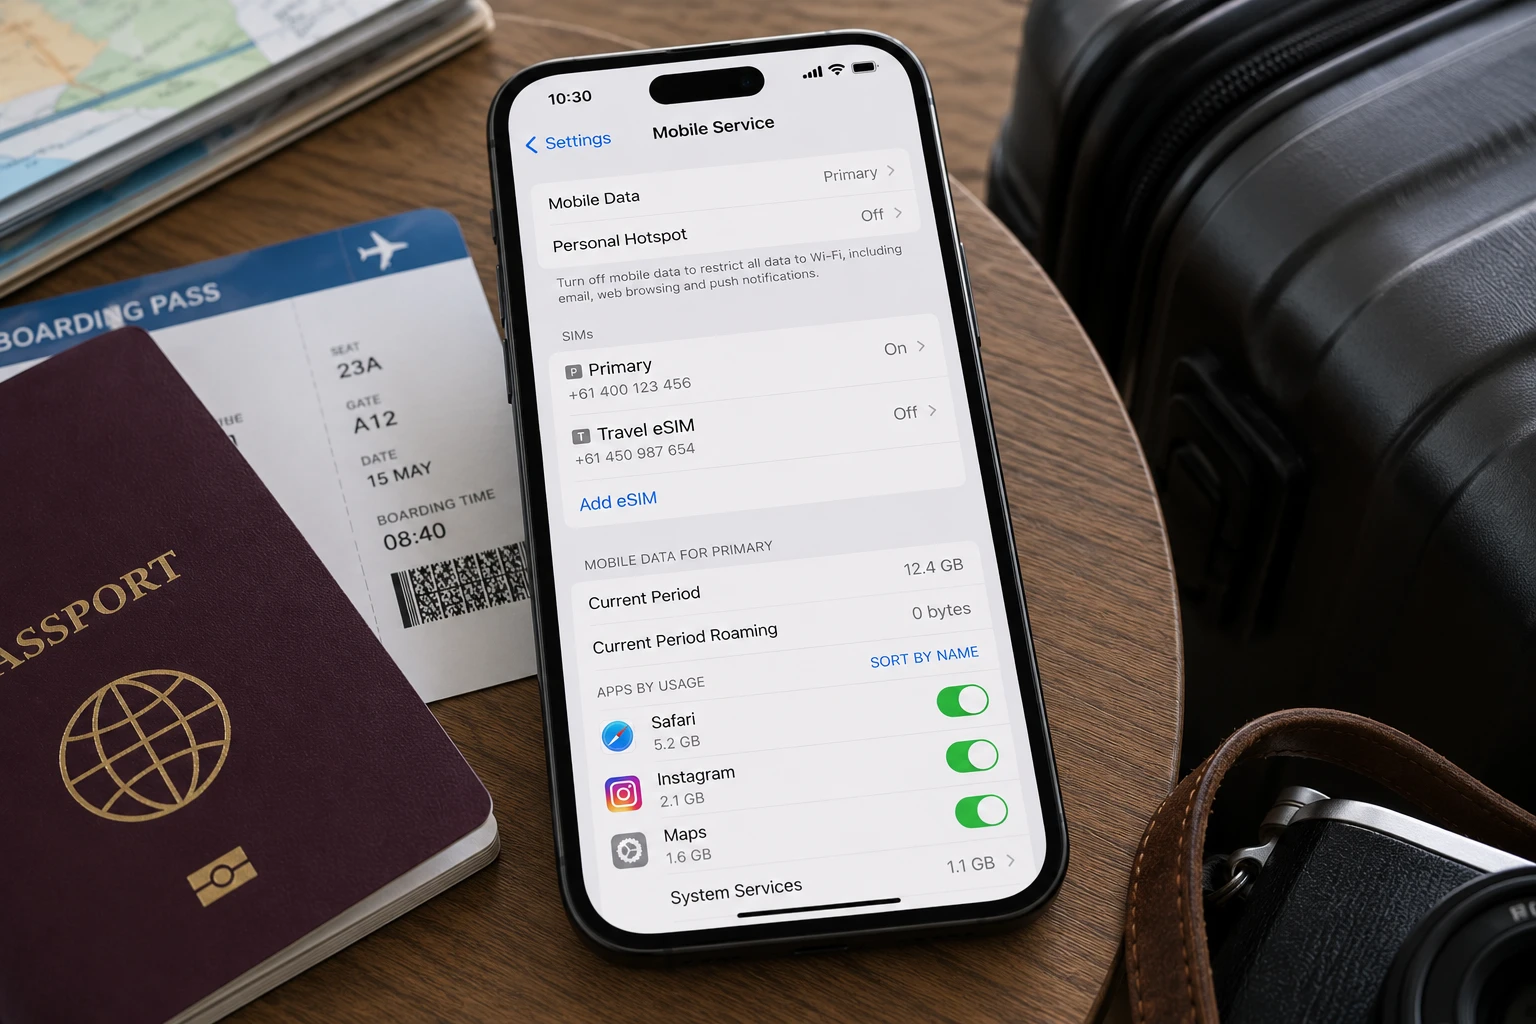
- Open Settings.
- Select Mobile Service or Cellular.
- Tap Add eSIM.
- Select Use QR Code.
- Scan the QR code.
- Complete the setup process.
Tip for iPhone Users
Give your travel eSIM a clear name such as "Japan Travel" or "Europe eSIM" to make it easier to identify later.
How to Install an eSIM on Android
Most modern Android devices support eSIM installation, although menu names vary by manufacturer.
Option 1: One-Click Installation (Recommended)
- Open the SuperiorMe installation email.
- Tap the installation link.
- Follow the prompts.
- Confirm installation.
Option 2: QR Code Installation
- Open Settings.
- Navigate to SIM Manager, Mobile Networks, or Network & Internet.
- Select Add eSIM.
- Scan the QR code.
- Follow the setup instructions.
Menu names may differ slightly between Samsung, Google Pixel, Motorola, and other Android devices.
When Should You Turn On Your Travel eSIM?
Before Departure
- Install the eSIM
- Keep your primary SIM active
- Leave the travel eSIM disabled
After Arrival
- Enable the travel eSIM
- Enable Data Roaming
- Select the eSIM for mobile data
- Allow it to connect to a supported network
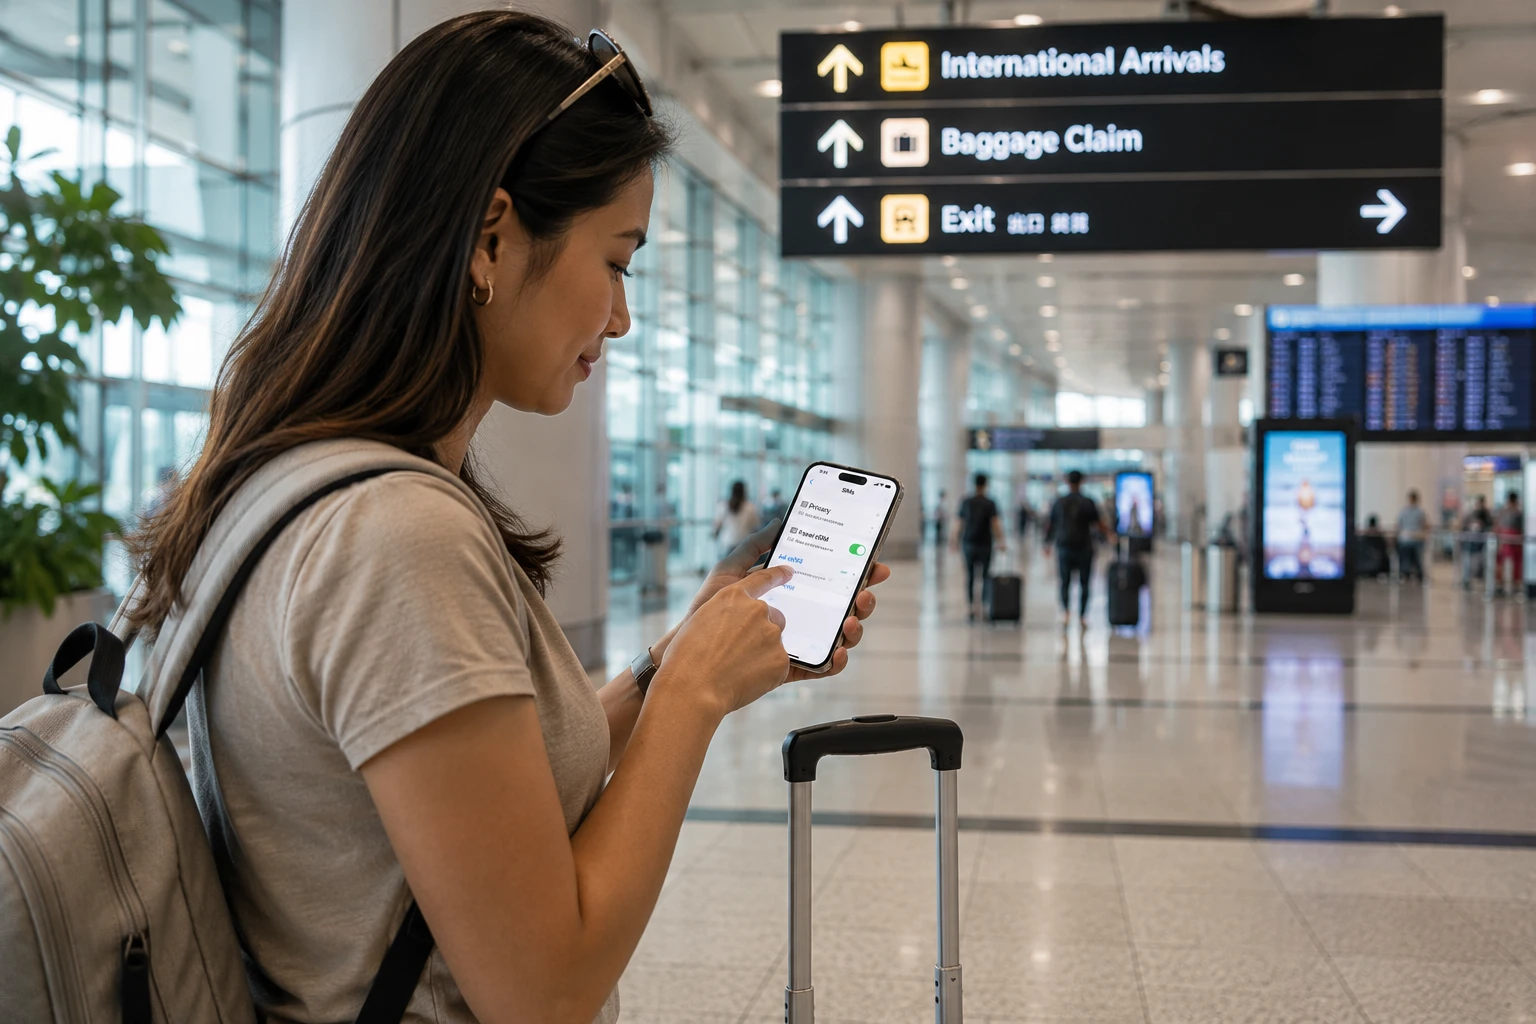
Once the eSIM successfully connects, activation occurs automatically and your plan validity begins.
Common Mistakes Travelers Make
Waiting Until The Airport
Airport Wi-Fi isn't always reliable. Install before leaving home whenever possible.
Forgetting Data Roaming
Most travel eSIMs require data roaming to be enabled to connect overseas.
Choosing The Wrong Data SIM
Ensure your travel eSIM is selected as the mobile data SIM after arrival.
Confusing Installation With Activation
Installing an eSIM usually does not start the plan. Activation occurs when the eSIM connects to a supported network.
Frequently Asked Questions
Does installing my eSIM start the validity period?
No. Validity begins when the eSIM first connects to a supported network.
Can I install my eSIM months before my trip?
Yes. SuperiorMe eSIMs allow activation within 180 days of purchase.
Should I install before travelling?
Yes. Installing before departure reduces setup risks and helps ensure immediate connectivity on arrival.
What happens if I accidentally activate early?
If you're concerned, simply leave the eSIM disabled until you reach your destination.
Do I need internet to install an eSIM?
Yes. Installation requires either Wi-Fi or a mobile data connection.
Ready to Travel?
SuperiorMe offers travel eSIMs for more than 180 countries and regions worldwide with instant delivery, easy installation, and flexible activation periods.
Install before you travel. Activate when you arrive. Stay connected from the moment you land.
Find Your Perfect Travel eSIM
Compare destinations, regions, durations, and data options across hundreds of travel eSIM plans.